If you've ever felt limited by the default posts options like posts and pages, you're not alone. Adding custom post types in WordPress can give you more freedom to showcase your work. Hence, in this guide, we'll show you how to do just that.
Whether you're a blogger, business owner, or artist, custom post types can help you organize and present your content in unique ways. We'll walk you through the process, making it easy to understand.
So, if you want to add custom post types in WordPress to take your website to the next level, you're in the right place. Let's get started!
Understanding Custom Post Types

Custom post types are like special categories for your content on WordPress. They're super useful because they let you create different types of posts beyond the usual "posts" and "pages."
So, instead of just having articles and static pages, you can add custom post types like portfolios, testimonials, or products. This helps to keep your site organized and makes it easier for visitors to find what they're looking for.
The big difference between default post types (posts and pages) and custom post types is flexibility. Default types are good for basic stuff, but custom post types let you get more creative and tailor your content to suit your needs better.
Plus, they improve the overall user experience by making WordPress site navigation smoother and content more organized. So, as you know what custom post types are, let’s understand why you need to add custom post types in WordPress.
Why You Need To Add Custom Post Types?
Adding custom post types in WordPress can be a game-changer for your website. Imagine you have a photography portfolio, customer testimonials, upcoming events, or a catalog of products. Instead of cramming all this into regular posts or pages, custom post types let you organize each type of content separately, making your site easier to navigate and more professional-looking.
With custom post types, you can create a dedicated portfolio section where visitors can browse through your stunning images without distractions. Or, if you're running a business, you can use custom post types for testimonials or you can also use google reviews wordpress plugin, showing off happy customers' feedback and building trust with potential clients.
Websites like Squarespace and Wix effectively use custom post types to showcase different types of content, from portfolios to event calendars, making their sites more engaging and user-friendly.
After learning about the usage of custom post types, I’m sure you must be eager to add custom post types in WordPress. So, without wasting further ado let’s get into it.
How To Add Custom Post Types In WordPress?
When you want to add custom post types in WordPress, there are two main ways to do it: manually through coding or by using plugins. So, let’s have a look at both of the methods.
Manual Method:

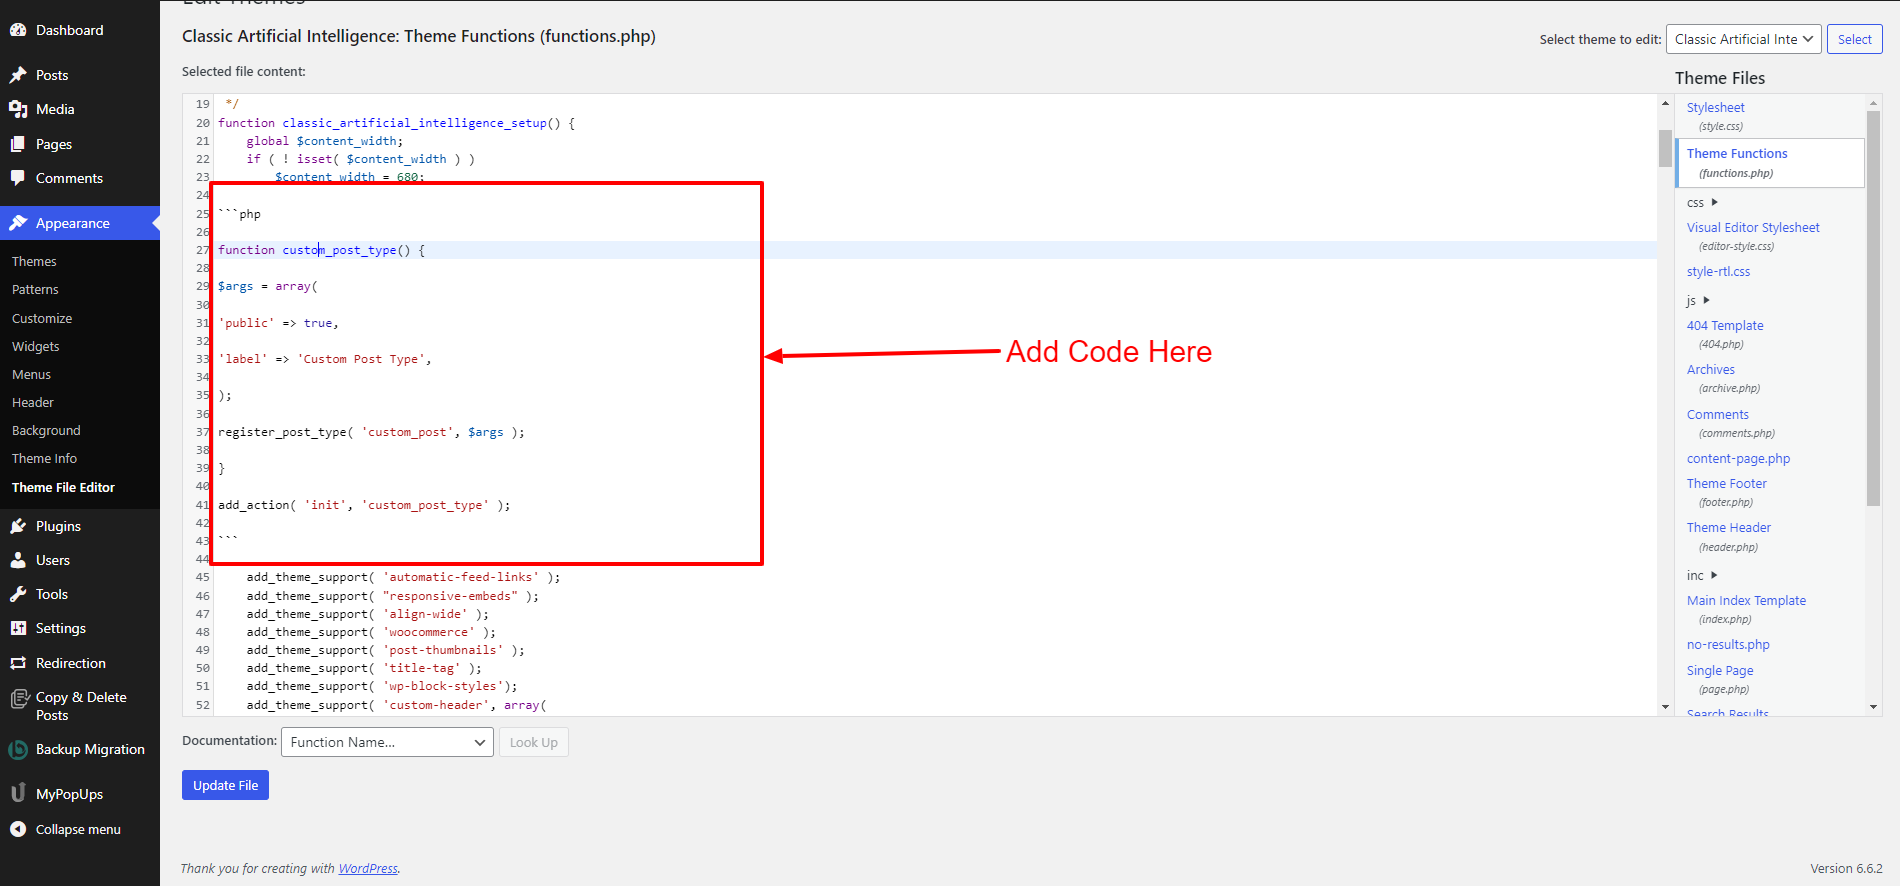
Open Your Functions.php File:
- Log in to your WordPress dashboard and navigate to "Appearance" > "Theme Editor."
- Locate and click on the "Theme Functions (functions.php)" file on the right-hand side.
Register Your Custom Post Type:

```php
function custom_post_type() {
$args = array(
'public' => true,
'label' => 'Custom Post Type',
);
register_post_type( 'custom_post', $args );
}
add_action( 'init', 'custom_post_type' );
```
Replace 'Custom Post Type' with the name of your custom post type and 'custom_post' with a unique slug.Save Your Changes:
- After adding the code, click the "Update File" button to save your changes.
- Now, your custom post type is registered, and you can start adding content to it.
Plugin Method:
Install Custom Post Type UI Plugin:

- In your WordPress dashboard, go to "Plugins" > "Add New."
- Search for "Custom Post Type UI" and click "Install Now" and then "Activate."
Create Your Custom Post Type:
- Once activated, go to "CPT UI" in your dashboard menu and click "Add/Edit Post Types."
- Fill in the required fields like Post Type Name, Slug, and Description.
- Optionally, configure additional settings like labels, capabilities, and taxonomies.
Save Your Custom Post Type:
- After configuring your custom post type, click the "Add Post Type" button to save it.
Customizing Custom Post Type In WordPress

When you add custom post types in WordPress, it's essential to customize them to fit your specific needs and preferences. This involves tweaking parameters such as labels, slugs, supports, and more.
Customizing these elements not only enhances the clarity and usability of your website but also ensures consistency and coherence across your content.
Whether you're creating a portfolio, testimonials, events, or products, tailoring your custom post types is crucial for delivering a seamless user experience.
To customize custom post types manually, follow these steps:
Labels: Adjust labels like 'name', 'singular_name', 'add_new', 'edit_item', etc., to better describe your content. For example, for a recipes custom post type, change 'name' to 'Recipes' and 'singular_name' to 'Recipe'.
Slug: Choose a URL-friendly slug that succinctly represents your custom post type. Avoid spaces or special characters. For instance, use 'events' as the slug for an events custom post type.
Supports: Enable supports such as 'title', 'editor', 'thumbnail', etc., based on the type of content you're creating. For a products custom post type, enable 'title', 'editor', 'thumbnail', and 'excerpt' to showcase products effectively.
When customizing custom post types, it's crucial to consider your specific content needs and the overall user experience. Ensure that your choices align with your website's design and navigation structure. Maintain consistency in naming conventions and design elements to create a cohesive user experience.
Displaying Custom Post Types
Once you've added and customized custom post types in WordPress, the next step is to display them on the front end of your website. This involves showcasing them in a visually appealing and user-friendly manner to engage your audience effectively.
One way to achieve this is by utilizing best WordPress templates or page builders. WordPress templates are files within your theme that control the layout and appearance of different pages on your website.
You can create a new template file (e.g., single-{post-type}.php) in your theme's directory and customize it to showcase your custom post-type content. Within these templates, you can use template tags like the_title(), the_content(), and the_post_thumbnail() to dynamically display the content of your custom post types.
On the other hand, page builders are plugins that offer a drag-and-drop interface for creating and customizing page layouts. Many page builders support the integration of custom post types directly into your page designs. while you create custom WordPress widget or module into your page layout, you can easily showcase your custom post-type content.
In addition to utilizing templates or page builders, you can also employ custom queries and loops to retrieve and display custom post-type content. Custom queries allow you to retrieve specific sets of posts based on criteria you define.
You can create a custom query using the WP_Query class and specify the post-type parameter to retrieve custom post-type content. Additionally, you can use parameters like 'posts_per_page', 'orderby', and 'order' to further customize the query results.
Loops, on the other hand, are PHP code blocks used to iterate through a set of posts and display them on the front end. You can customize the loop to control the layout, styling, and formatting of your custom post-type content within your WordPress templates or page builder modules.
Conclusion
In conclusion, we've covered how adding custom post types in WordPress can boost your creativity and make your website more unique. Custom post types let you go beyond the basics, allowing you to showcase different types of content like portfolios, events, or products.
Whether you're new to WordPress or a seasoned user, creating and customizing custom post types is easy, thanks to plugins and WordPress's user-friendly setup. And, don’t just add new post types but tailor them to fit your needs and improve your visitors' experience.
So, what are you waiting for buddy? Let’s get started to customize and add custom post types in WordPress and see how they can enhance your WordPress site.

